Adding a default user
To access the instance as a specific user, you must first configure your user settings.
Remember that the lack of such configuration after creating the instance will result in the lack of users to whom you can access the instance.
Before configuring user settings, you can add your public key, if you plan to access the instance using an SSH key.
Add public key
This step is not mandatory if you do not plan to access your instance via SSH with an SSH key.
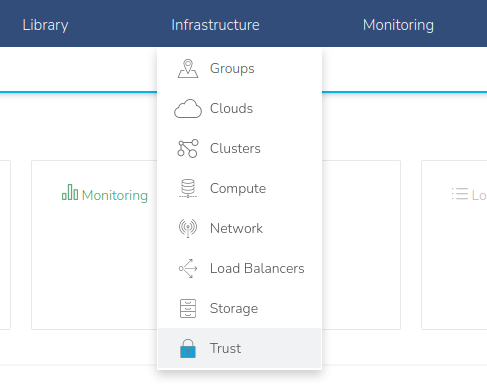
To add a public key, go to Infrastructure → Trust.
To add a new key, press the "+ ADD" button.

After pressing the button, a form with adding a new key will appear. Enter the following fields:
- NAME - key name, it is not associated with the username and can be any
- PUBLIC KEY - public key, you can copy the key and paste into this field or search for the key file via the "Browse" button
After entering this fields, you can save the key by pressing the "SAVE CHANGES" button.

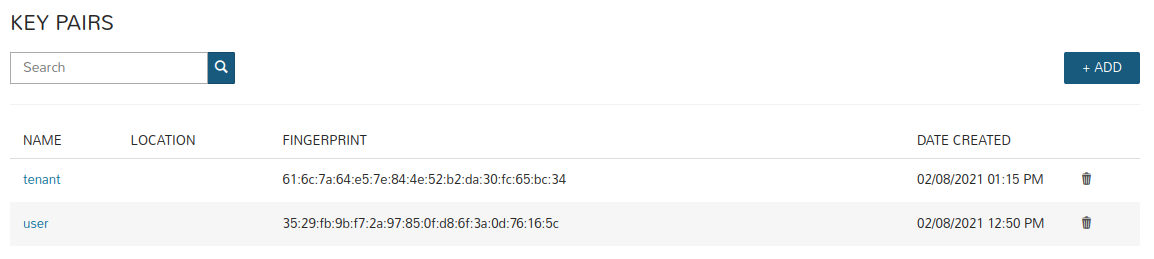
After adding the key, it will be visible in the key list.

With the public key added, you can go to user settings.
User settings
To configure these settings, press on your username in the upper right corner and select "USER SETTINGS".

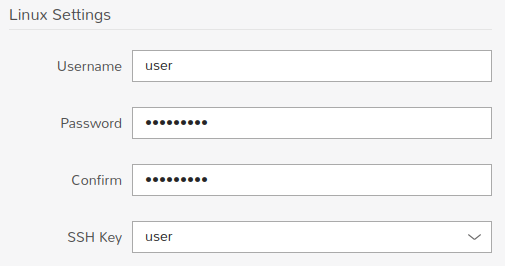
In the "Linux Settings" section enter:
- Username - user with the username entered in this field will be created on the new instance (Remember username must be unique in "User settings" and "Tenant settings")
- Password - password for the user with the username entered in the previous field. This password allows you to gain root access on the instance. The password must consist of at least 8 characters, including one capital letter, one number and one symbol.
- Confirm - re-enter the password
- SSH Key - optional - select the previously added public key that will be assigned to this user
After entering this fields, press the "SAVE" button to save these settings.
The SSH key is not required to access the instance via the console from the Morpheus panel.
The following settings will be applied to the instance if the user (in this case "Wekeouser") will create a new instance.
Other members of this tenant, if they do not know the settings made by this user and do not have a private key that matches to the public key of this user, they will not be able to access the instances created by this user.
Tenant settings
If more than one member has access to the tenant, it is worth considering configuring settings that will be global for the entire tenant.
A new "tenant" key has been added to configure these settings.
To configure such settings, go to Administration → Settings.

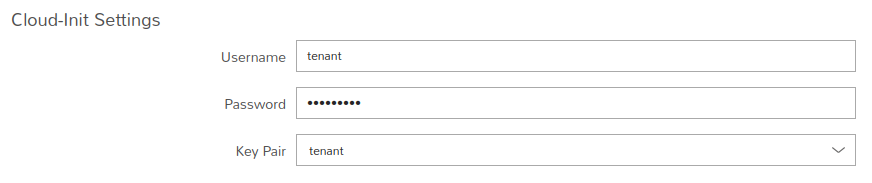
In the "Cloud-Init Settings" section enter:
- Username - user with the username entered in this field will be created on the new instance (Remember username must be unique in "User settings" and "Tenant settings")
- Password - password for the user with the username entered in the previous field. This password allows you to gain root access on the instance. The password must consist of at least 8 characters, including one capital letter, one number and one symbol.
- Key Pair - optional - select public key that matches to the private key that other members of your tenant have access to
Press the "SAVE" button to save these settings.
After configuring these settings, be sure to share them with other members of your tenant.
The Cloud-Init Settings will be applied to each new instance, regardless of which user created it in the tenant.
Remember that any saved changes in User/Tenant settings will not update them on currently existing instances.
New/changed settings will be applied to the new instances. They will not be set/updated on existing instances.